How to Prepare For Your First Design Appointment

7RDS_blog_Design-Appointment copy.jpg

You’ve decided you’re ready to build a new home or maybe you’re ready to redesign a room or rooms in your existing home. Our designers here at RDS are very skilled when designing rooms and new homes, but there are some things we would love for you to do before meeting with us for your first design appointment. 

Start With Measuring:

When you meet with us and say, “I want a large Master Suite, or Bathroom, or Great Room”, we’re going to ask you what large means to you. So start by measuring your existing room(s) to see what we have to work with, and how much you might want to add or change (if possible). If you’re starting with a new home, go outside where you have space and measure out what you’re thinking, or go into that room you love in your friend’s house and measure the room. Having an idea of the size of your current rooms, or what your dream sized room or home might be will help us understand your vision.

We Love Photos:

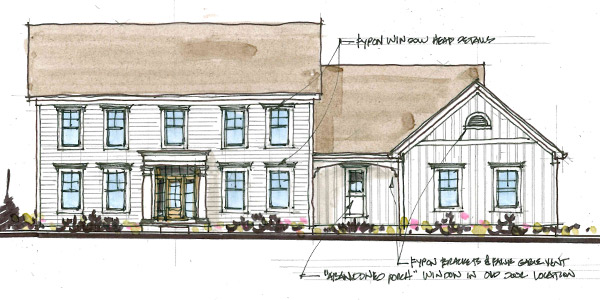
“Every picture has a story to tell” and while we love seeing photos of your children, we really want to see photos of the rooms you want to change and photos of rooms you’ve fallen in love with for a new home or redesigned space. When you meet with us the first time, having photos of the rooms in your home that you want to redesign, gives us a first look. In the same vein, having those inspiration photos from Houzz, Pinterest, your favorite sites, and actual photos, helps us to understand your vision. The more photos the better, they give us more insight into your dreams, making it easier for us to make them your reality. 

Our First Meeting:

If you’re planning a new build, we’ll meet with you at the office so we can get to know your needs and wants, answer and ask questions, and check out those inspirational photos. If you are remodeling, we typically first meet at your home, giving us a first-hand look at the space and your vision for transforming it.  

Our designers can’t wait to meet with you, see your photos (including the ones of your kids!), and get the process started to redesign your existing rooms or help you create your new home.

Check out our Front Porch Friday Video - How to Prepare for Your First Design Appointment 

It’s All About the Filters!

8RDS_blog_Changing-Filters copy.jpg

We all have them and it’s one of those things we might just forget about. But we shouldn’t. Just what does the furnace filter do for our homes and why is it so important to change them? Our Front Porch Friday video discussed just that. At RDS, we know how important and necessary our furnace filters are to our homes, but do you know everything you need to know about these filtration devices?

What Does the Filter Do?

  • The main purpose is to protect the blower fan from dust and debris pulled in from the return duct.
  • The filter keeps the quality of the air you are breathing in cleaner.
  • It helps remove allergens from the air, which can, in turn, help your allergies.

 Why Do I Need to Replace or Clean It?

  • A clean filter promotes proper airflow.
  • Replacing the filter helps to maintain and extend the life of your furnace.
  • It helps reduce your monthly gas or electric bill because the furnace doesn’t have to work harder or longer.

 How Often Should It be Replaced?

  • The longer you go between replacements, the harder your furnace will have to work, so you need to know your furnace’s requirements. 
  • Every furnace is different, as is how it is being used in your homes, so it might take some trial and error to get the right balance of efficiency and cost for you.
  • This is dependent on the type of furnace you have, but twice a year at the very minimum. Most furnaces will need to have filters replaced every 30 - 90 days.
  • Inexpensive filters should be replaced monthly, but more often if you have pets or smokers.
  • Some furnace manufacturers suggest replacing the filter every 3 months, but it is important to check the filter monthly for blockage or build up.
  • An electrostatic filter, the type that is cleaned by removing it and running it through a cycle in the dishwasher, should be cleaned according to the owner’s manual.
  • If you don’t replace your high-efficiency filter when needed, it might end up costing you money!

 I Don’t Know What Size Filter or Kind I Have…Help!

  • Check for the size and kind on the side of your existing filter, or take the filter to a home improvement store and they can help you.
  • Not all filters can be purchased in a home improvement store, but can be found online or purchased through your furnace professional.
  • Not all filters are created equal and come in many styles, sizes, ratings, and price points:
  1. Filter Efficiency Ratings range from 1-16 (the MERV rating) with 8-11 very adequate for most homes. If you don’t see a MERV rating number, just remember that usually the higher the number rating assigned to your filter, the better filtration it has. Surprisingly, the highest rating and expensive filter might not always be the best choice.
  2. Some common styles include disposable fiberglass, disposable pleated (a popular option), disposable electrostatic, permanent electrostatic, and high-efficiency pleated.
  3. Filter thickness ranges from 1”- 4” and size varies with the type of furnace.

 What Else Should I Know? 

  • If you have severe allergy issues, you might want to get your vents professionally cleaned and then change the filters regularly.
  • Turn your furnace off when replacing the filter or working on your furnace.
  • If you notice dust and hair around the filter opening, vacuum it.
  • If your system gets heavy use in the summer and winter, you might need to replace the filters with more frequency.
  • Have your system checked yearly by a licensed professional. They will make sure the system is working properly, no gases are escaping, connections are secure, and you won’t wake up to a cold house one morning.
  • Keep the space around your furnace and all air returns clear of clutter, boxes, and furniture. This will help your furnace not only work more efficiently but keep you safer, reducing any risk of a house fire. 

 Check out our Front Porch Friday video here for Replacing Furnace Filters


Preparing Your Deck for Summer

1RDS_blog_Decks copy.jpg

Spring is finally here and we’re all thinking about lazy summer days and nights spent on our decks. At RDS, we love it when we see a deck being built, knowing what fun it will provide the family. Grilling out, sitting, reading, watching the birds, and enjoying time with family and friends, all happen on a deck. But is your deck ready for everything that will happen on it this spring, summer, and fall? As your residential designers, we’ve done the research to help you get your deck in party shape!

Structural Integrity:

A quick look at your deck, no matter the age, isn’t enough. Get under the deck and inspect the posts and beams that hold up your deck. Any chunks of wood missing? Touch the columns to make sure they aren’t soft, spongy, or showing signs of rot. Even pressure-treated wood can show signs of rot, especially in areas where it touches the ground and areas where non-rated pressure-treated wood might have been used. Don’t forget to check all railings to be sure they are still secure. Anything amiss? Call a contractor or handyman and get these problems fixed. Rain, snow, and ice can do a number on decks, especially older ones or decks that haven’t been treated, so do your due diligence to keep the deck structurally sound. 

Dazzling Decks:

The structure is sound, so now it’s time to make your deck dazzle. Clear everything off of the deck so you can see all of it. Search for boards or nails that have come loose and replace as needed. All wood decks will have this issue over time. 

Now comes the next step – cleaning. If your deck is a composite deck, cleaning is a breeze. Scrub it with a soap and water solution and removed any mildew or dirt that built up over the past year. Rinse it well, dry it and let the decorating begin.

A couple more steps are required for those of us that have a wood deck. Clean and dry the boards, maybe with the help of a pressure washer. Just don’t spray with too much pressure or you’ll take off the paint or damage the wood. 

If your paint is peeling or the stain has faded, scrape off the loose paint, sand it, prime it, and repaint. Have fun with the color! You could even paint patterns or use a different color as a border. Staining might be an option for you. It allows the grain to show through and doesn’t wear as quickly as paint does. Follow the application and care process no matter which application you choose to create your best summer deck.

Add the Accents:

Now the fun begins! How do you use your deck? Do you have shady and sunny areas for you and your guests? What mood do you want to set? 

There are many options available for you to create the best looking, comfortable, entertaining space you could imagine.  This is the place for bold pops of color, fun, colorful outdoor rugs, sail shades, umbrellas, or a pergola, and a variety of furniture – think about a big table, some low tables, comfy chairs, loungers, and seating that is perfect for kids. 

Create different seating areas that serve different purposes. Do you want a safe fire pit area? A gathering area perfect for conversations? An outdoor kitchen and bar? An eating area? A spot for the kids to gather and play?  Your own personal retreat?

And don’t forget planters filled with a variety of plants. Create a privacy wall with tall plants, add pops of color with colorful annuals, and plant herbs for delicious summer meals. You might want to plant lavender, marigolds, citronella grass, rosemary, or peppermint to keep those pesky mosquitos away. Use plants like asters, bee balm, butterfly bush, cosmos, and lantana to draw butterflies to your yard. 

Whatever you desire, you can create it on your deck!

Did you see our Front Porch Friday Video? Click here Preparing Your Desk for Summer to view it. Have a fantastic summer on your deck! 


Wood Flooring - What to Choose

9.5RDS_blog_Hardwood-Floors copy.jpg

The choices are endless when you are choosing flooring for your home. One of the most enduring choices is hardwood flooring. At RDS, our designers love the look and feel of hardwood flooring. Its natural beauty can go with any décor or style you choose. Nothing says warmth, family living, sophistication, or comfortable living like hardwood. It is chameleon-like, creating the feel and look you want in any room. 

There are several types of wood flooring available and as we shared in our Front Porch Friday Hardwood Flooring video, determining your needs and wants will help you make the right choice.

Solid Hardwood Flooring:

  • Durable
  • Available in unfinished or pre-finished wood species
  • Available in many wood species – oak, maple, cherry, ash, or walnut
  • Varied plank sizes and finishes 
  • Unfinished is sanded and finished following installation, taking more time to install and finish to your custom stain specifications
  • Pre-finished is sanded and finished at the factory, making for a faster installation
  • Can be sanded and refinished many times
  • It is susceptible to humidity changes

Engineered Hardwood:

  • Complex product consisting of several layers
  • Outermost layer is a hardwood veneer of the desired tree species
  • Inner layers are made of plywood, high-density fiberboard, or a lesser hardwood
  • Can not be sanded and refinished as often as solid hardwood
  • Low maintenance and durable
  • An excellent choice for any room in your home

Laminate Wood Flooring:

  • Created by compressing composite wood
  • An image of hardwood is placed over the composite to form a laminate, replicating the look, grain, and texture of hardwood
  • Easy to install, most just snap together
  • Budget friendly, but we suggest you choose a premium quality product 
  • Not as durable as hardwood or engineered hardwood, but is resistant to stains, scratches, and wear and tear
  • Wood floors are timeless and always a smart choice when building or remodeling your home.

Our designers are well versed in flooring options and will make sure your feet are walking on the best possible floors for you! 


The Demo and Remodeling of a Kitchen

9RDS_blog_-Kitchen-Remodel copy.jpg

Are you thinking about remodeling your kitchen? Do you know what is involved, or do you only have HGTV as your guide? At RDS, one of our clients is in the thick of a kitchen remodel and we thought we’d keep you updated and involved in the remodel. Knowledge is power, and our designers can help you navigate this process.

If you’ve been following our Front Porch Video series on FB this is the first of three episodes about the remodeling of a kitchen and what to expect during the process. If you haven’t seen our Front Porch Video series, we’re excited to have you start watching!

There are many ways to remodel or update your kitchen. Cabinets can be refaced, doors replaced, simple hardware updates can be made, or the cabinets can be completely removed, and new ones installed. In this home, everything has been removed and they’re starting over!

What You Might Find (And We Did):

In this home, the original kitchen had an illuminated ceiling like many homes from the 1980’s. A lot of light but a low ceiling of plastic panels. Removing this along with the soffits will open up the room visually. Since the lighting will change over to can lights and undercabinet fixtures, the wiring and switches will have to be reworked.

Removing soffits comes with its share of problems. Very often, plumbing lines and HVAC ducts are hiding within, so they must be relocated or at least moved so that they are very close to the ceiling. 

In this project, the remodeler, Dave Osmond Builders, had the experience and foresight to leave about 6” of space above the cabinets, allowing drain pipes and ducts to be hidden behind crown molding. This is something to know about and understand when remodeling and pipes and ducts need to be hidden.

Taking everything back to the bare bones of the room makes for a messy, dusty workspace! Doorways to other rooms need to be closed off to keep dust to a minimum. Drywall and trim debris must all be hauled out to the rented dumpster in the driveway.

How does the flooring look? In this home, a tile floor is being removed. There are many flooring options, but these clients chose a site finished hardwood that will be ¾” thick. You could also use a new tile, hardwood laminate, or engineered hardwood, each may have a different thickness and the cabinets must be placed to accommodate that dimension. You don’t want your dishwasher installed and not be able to get it out later when it needs to be replaced.

Keep checking back for more info and photos for this project. This Front Porch Video shows you all the details as this kitchen remodel begins. We’d love to work with you to design your kitchen remodel and help you guide your way through what will be an amazing transformation, no Property Brothers needed!


Kitchen Countertops - What to Choose?

12.5RDS_blog_Kitchen-Countertops copy.jpg

When you are building a home or remodeling an existing home, you have so much to think about when selecting design options. One of the biggest and most visible are your kitchen countertops! There are so many incredible options available. The trends are always evolving, yet some continue to hold their value, charm, and appeal. 

Recently, at RDS, we launched our Front Porch Friday video series. Our first video focused on kitchen countertops and we’d like to continue the discussion in this blog. What do you need to know about the current trending countertops and what is making its way onto kitchen counters? 

Here and Trending:

 Granite:

  • Every piece is unique and distinct in its appearance
  • It looks luxurious which makes it a very popular choice
  • It is resistant to heat, nicks, and normal use
  • The larger the piece makes it harder to match
  • If sealed properly and routinely, it is very durable
  • It is still expensive, but slowly becoming more affordable
  • A durable prep surface

Engineered Quartz:

  • A manufactured stone product that is almost maintenance free
  • Extremely durable making it scratch, heat, stain, and impact resistant
  • Available in a wide range of colors and styles
  • Being non-porous means it doesn’t need to be sealed

 Butcher Block

  • Very appealing as an accent piece
  • Creates a feeling of warmth
  • Easy to clean, but must be properly sealed
  • Sealing properly gives it antimicrobial properties, making it more sanitary for meal prep
  • Can be damaged by stains and water, but can be sanded and resealed

 Up and Coming:

 Quartzite:

  • A very durable surface that withstands heat
  • Appearance is more like granite than manufactured quartz since it is a naturally occurring rock
  • High-end look
  • Needs to resealed every year or it can stain

Marble:

  • Seeing more and more of it
  • Natural look is comparable to quartzite and granite, but more subdued in color
  • Product is very soft, making it susceptible to scratches and stains
  • Needs constant tender loving care and sealing 
  • Elegant look
  • Expensive 
  • Waterproof and heatproof

Concrete:

  • Not what you find on your basement floor
  • One of a kind, unusual industrial look
  • It is versatile, able to cast to your specific size and shape 
  • Tinted to any color, mixed with glass or tile, textured, or polished
  • While it is porous, it can be sealed
  • Custom work makes it a bit expensive 
  • Scratch and heat resistant

Whatever you choose, your kitchen will be a reflection of your dreams for the space. Our designers would be happy to meet with you and help you make the perfect choice for your newly designed kitchen.  Do you have more questions about countertop products? Konkus Marble & Granite, one of our trusted suppliers, is here to guide you in your search. 

Westport Homes Testimonial

14.5RDS_blog_-Westport-Homes-Testimonial copy.jpg

We would not be successful without the expertise of the builders and contractors that we work with on a daily basis. They build the vision that we help create. Our relationship with our builders and contractors is important to us. Westport Homes is one of the builders that we work with and here are a few of their thoughts about working with us at RDS. 

Name: Susan Hall, Director of Architecture, Westport Homes

How was your experience with RDS – Residential Designed Solutions?
Our Westport Homes Columbus Division’s experience has been a positive one with RDS for the last 5 years. They are conscious of our schedules and help with many aspects of our architectural needs in the partnership we have established. 

What did you have designed or redesigned by RDS?
We have had numerous master architectural construction document sets developed, options to master plans added and individual specific contracts created.

What services do you like best that RDS provides?
They have assigned one lead designer to our account that takes personal ownership. They oversee our account by knowing all of our specifications, subdivision requirements, and develop out lot specific homeowner standard options and custom options selections with great care to the details. They have even visited our model homes and like to keep up with new model openings so they can stay “on top” of our products offered to home buyers.

Who else did you use or speak with in planning the design of the home before choosing RDS?
Westport Homes Columbus Division has not used any other company for our architectural needs.

What have your needs been and what are your future needs of an architect/designer?
Our needs have been to have help in developing out our preliminary designs into architectural construction document sets, adding numerous options to our existing master home plans, and developing individual lot specific plans. Our future needs are to continue to use RDS in the same manner but at a higher volume of lot specific plan development. I also foresee using their design services for future development of plan offerings to our clients.

How were challenges /issues/decisions/questions handled and communicated?
We handle most of our communications via email. We also communicate by phone as well as meetings in person. RDS has always met our needs and been available to us during our partnership with them. In fact, with our growing volume this past year, they have added additional staff to work on our account during peak times to meet deadlines.

What was your overall experience like?
Our overall experience with RDS has been a positive partnership in meeting the architectural needs for the development of master homes plans, adding standard options to the master plans, and creating individual lot specific plans with standard options, custom options, and local municipalities’ requirements.

What advice would you offer to a builder who is having someone design a home or redesign a space in the home?
We have and will continue to advise anyone needing architectural services to reach out to RDS. RDS has been in Columbus for almost thirty years and they know the building codes and local municipality requirements. RDS is actively involved in the building industry and have the personnel and expertise to help in any aspect of providing design services.

Would you use RDS again?
Westport Homes will most certainly continue to use RDS for our architectural needs.

We take pride in the services we provide our builders, contractors, and clients. Our designers will work with you to help your visions become reality. We’d be happy to talk with you and see what services we can offer. We thank Westport Homes for their continued support and confidence in us. The feeling is mutual; they are a fantastic group to work with.


Top Design Trends

14RDS_blog_Top-3-Trends copy.jpeg

At RDS, Residential Designed Solutions, we pride ourselves on staying ahead of the trends so when our clients come in with ideas that are trending or need our help to create what they can’t verbalize, we’ve got the answers! There are many trends out there, and three that were popular last year are still popular for this year! The beauty is not only that are they trending, but also they are timeless, so you can’t go wrong incorporating these into your home. 

Indoor/Outdoor Convergence:

  • Indoor/outdoor convergence means making the outdoor living areas come in, and the indoor living areas go out by creating a fluid separation between spaces.
  • Retractable glass walls, floor-to-ceiling windows, walls or doors, and doors that are stackable are ways to accomplish the indoor/outdoor transition.
  • The goal is to connect sunrooms, pool areas, patios, or outdoor kitchens with the indoor great room, dining room, or kitchen, making them appear to be one large open space.
  • Outdoor living space has become as important as indoor living space; so connecting the two seamlessly is crucial. The need for areas to relax and entertain has become a necessary design feature.

Board and Batten:

  • Board and batten is a type of paneling that alternates wide boards and narrow battens (wooden strips).
  • This material used to be relegated to the exterior of a home but has now emerged as an interior trend.
  • Using board and batten either vertically or horizontally adds depth and interest to walls, especially in entryways. 
  • Varying the width of the boards creates a customized look and feel.
  • Using board and batten will create a playful, rustic, yet contemporary design.
  • The battens are usually placed over the seams of the boards. 

Mid-Century Modern:

  • Clean lines, large windows, open spaces that integrate nature, and flat planes are hallmark designs of mid-century modern architecture.
  • The goal of mid-century modern design to make what is old, new, and what is new, old.
  • Windows, trim, types of materials, changes in elevation inside and out, exterior design, walls, and interior design can all be altered to create this look.
  • The mid-century modern design has simple contemporary elements, so taking an older home and renovating it is a viable option, as is designing a new home from the ground up. 
  • The proportions of the home are kept lower, allowing nature to be viewed from all rooms, and daylight to be let in. The front of the home will be more private than other areas of the home.
  • Outdoor living is an integral part of the design, giving you a much-loved area of your home.

Trends are just that-trends, but these three are timeless, contemporary, and will be here for a long while. Our designers would be honored to work with you to design the home you have been thinking about. 

What Our Clients Have to Say

16RDS_blog_Katy-Burrier-home copy.jpeg

At RDS, we believe that designing a home is one of the most satisfying parts of our work. We love building relationships with our clients, and working with them to bring their dreams to reality. We want you to get an idea of what our clients think of their experience when working with us. 

Name: Katy & Jamie Burrier

How was your experience with RDS – Residential Designed Solutions?
Our experience was amazing. From our first meeting to the final touches, Jim and his team understood our vision. They were incredibly professional and responsive to all of our needs.

What space(s) did you have redesigned, (if applicable) or did you have a new home designed?
We had a new home designed from scratch.

What is the favorite aspect of your new home design?
Our favorite part was the initial drawing that Jim provided because it was designed by hand and was a true reflection of our dream come true on paper!

If you could change one thing, what would you change?
Honestly, we had to think hard to answer this question! I think the only thing we would say is that when the invoices are created, having line item details for invoicing would help with understanding changes.

What was your overall experience like?
We felt like we were in GREAT hands with Jim and his team. We always felt like we mattered as a customer. If it weren’t for Jim’s experience and creativity we wouldn’t be building where we are. We were stuck with how to split the lot and make our house work while leaving a nice sized lot for other buyers (or we wouldn’t have been able to buy the property). In 15 minutes on-site, Jim had an idea that saved our dream lot and made it possible. You don’t see that every day. 

What advice would you offer to someone who is designing a home or redesigning a space in the home?
The most important thing is to spend time ahead of your first meeting looking at floor plans, Pinterest, and Houzz and know in general what your vision is. We actually cut out floor plans and brought our favorite parts of each one to our first meeting, which we believe helped Jim understand our vision from the start. And he’s simply THAT good. Did you know he can draw like a pro upside down so you can be involved in the conversation as we talked through options?

Who else did you reach out to for designing your home?
We did not consider another architect after meeting Jim. We knew he was a good fit for us and had the experience and referrals to back that decision up! 

Would you do it again?
If and only if it was with RDS!

Let our designers help you make your dreams a reality. We’d be honored to work with you! 

Jim's Tip - Who Comes First?

16.5RDS_blog_Who-Comes-First copy.jpg

I recently read an article in one of our trade publications written by a builder explaining in great detail why he insisted on being the initial contact with potential clients. He spent a good amount of column space demonstrating that his clients were best represented by working through his process to develop designs for their project. His belief was that only through a process such as his, would clients be able to have plans developed that would be able to be built with-in their budget.

Having worked as a residential designer both independently and in the employ of several builders, I certainly understand his perspective. It is very common for clients to come into our office with grand dreams, essentially with “champagne taste and a beer budget” as the saying goes. Someone must introduce some hard cold facts into the conversation very early so that realistic expectations are set before pen or mouse are in motion.

There is nothing worse than having a set of construction documents fully developed only to find out that the house is way over the client’s budget. A lot of money has been wasted including the builders’ time along with all his trade partners, bidding a useless set of plans. The point that the builder was emphasizing was that costs must be part of the discussion and controlled all the way through the design and construction process. I couldn’t agree more.

All our designers have construction management and hands on building experience which allows us to have a realistic cost perspective when initially meeting with clients. We always have a cost discussion before we get started so it really doesn’t matter who qualifies the client. The key is tracking costs at every step of the design process, from initial sketch “ballpark” pricing to final construction/contract documents.

The point that I want to convey is that it really doesn’t matter who comes first if both the builder and their designer are working closely together. The resulting home will be one that the clients are thrilled to own at a cost they are comfortable with. Contact RDS to see how seamlessly we can become part of your team.